I have several Raspberry Pies around the house, serving as voice interfaces (Rhasspy “satellites”), some of them also as media players using Kodi. They all have a sound card, which contains two microphones and an audio output, connected to a small speaker.
For a speaker, I typically use the passive half of an Amazon Basics PC Speakers pair, available from amazon.de in Germany, or amazon.com in the US.
This is part of my Rhasspy-and-OpenHAB home automation setup. For an overview, see this blog post.
Hardware
I have used Raspberry Pi models 2B, 3B and most recently 3A+ for these units. The Raspberry Pi 3A+ in particular has very low power consumption. With a ReSpeaker 2-Mic HAT, under Raspbian 12 (bookworm), just running Rhasspy, powered by some noname USB charger, it initially consumes about 1.1 W, this drops down to 0.6 W after a while, very low, very nice.
For a sound card, I mostly used the Seeed ReSpeaker 2-Mics Pi HAT . Most recently, I have also used a “Keyestudio ReSpeaker 5V Expansion Board 2-Mic Pi HAT V1.0” from Aliexpress, which appears to be a clone of the original Seeed product, except that it uses common JST-XH2.54 connectors, whereas the original product uses the proprietary “Grove” connectors, and a 2.0mm pitch connector for the speaker.
Operating system and kernel version
In a previous version of this blog post, I stated that I had to use a v5 kernel, i.e. Raspbian 10 (buster), because the sound card driver on newer kernels wasn’t working. Now, I have figured out how to use the latest Raspbian (12), and edited this blog post accordingly.
My most recently built Raspberry Pi based satellite runs on Raspbian 12 (bookworm) and Linux kernel 6.1.0-rpi8-rpi-v7. This is a Raspberry Pi model 3A+. I am using the “Raspberry Pi OS Lite” image dated Dec 5th 2023 from the Raspberry Pi website.
Install sound card driver
I didn’t like the drivers provided by the manufacturer of the ReSpeaker sound card, too many changes to my setup, too invasive, so I am using the simpler driver for the WM8960 sound chip that comes with the operating system
Edit /boot/config.txt (under Raspbian 11 bullseye) or /boot/firmware/config.txt (under Raspbian 12 bookworm) and include
dtparam=i2s=on
dtoverlay=wm8960-soundcard,alsaname=wm8960
Configure sound card settings
The WM8960 sound card has a lot of configuration parameters, I’m not claiming I understand all of them. The following is the output from amixer --card wm8960 contents for a configuration that works for me.
Use alsamixer -c wm8960 to adjust your sound card accordingly. Once you are satisfied with your settings, store them with alsactl store.
In my settings, microphone gain is cranked up fairly high, so I can speak to it from 2-3 meters away without raising my voice. Also, while the sound card has 2 microphones, I only feed one of them to the voice detection engine (parameter ‘ADC Data Output Select’ is set to 1, meaning ‘Left Data = Left ADC; Right Data = Left ADC’. Theoretically, one could use the signals from both microphones for some sophisticated digital signal processing like beamforming, but that is not supported by Rhasspy, as far as I know.
Enable ALSA to combine multiple audio streams, and convert sample rate etc.
I noticed that, out of the box, the sound card driver only accepts sound files at 16 kHz and 48 kHz sample rates. Also, once an application like Rhasspy is hogging the sound card, no other application can play sounds. In my case, I wanted the squeezelite music player on the same machine, which didn’t work at first.
The Linux ALSA sound system offers to define a mixer device, which can combine multiple audio streams, and adjust sample rates etc. as needed. To use this, create a file /etc/asound.conf and enter
pcm.mix8960 {
    type plug
    slave.pcm "dmix:wm8960,0"
    hint {
      show on
        description "Analog Output - Use wm8960, mix multiple streams, convert samples, format, and rate."
    }
}
This creates a virtual sound card named mix8960, so we can configure Rhasspy to output to that device. You may have to say alsactl kill rescan to get the system to recognize the change.
Test the driver
Let’s test the driver. First, see which sound cards are available. On my Raspberry Pi, this is the response I get when I enter aplay -l:
**** List of PLAYBACK Hardware Devices ****
card 0: Headphones [bcm2835 Headphones], device 0: bcm2835 Headphones [bcm2835 Headphones]
  Subdevices: 8/8
  Subdevice #0: subdevice #0
  Subdevice #1: subdevice #1
  Subdevice #2: subdevice #2
  Subdevice #3: subdevice #3
  Subdevice #4: subdevice #4
  Subdevice #5: subdevice #5
  Subdevice #6: subdevice #6
  Subdevice #7: subdevice #7
card 1: wm8960 [wm8960], device 0: bcm2835-i2s-wm8960-hifi wm8960-hifi-0 [bcm2835-i2s-wm8960-hifi wm8960-hifi-0]
  Subdevices: 0/1
  Subdevice #0: subdevice #0
When I enter arecord -l to see the list of available sound card inputs, I get
**** List of CAPTURE Hardware Devices ****
card 1: wm8960 [wm8960], device 0: bcm2835-i2s-wm8960-hifi wm8960-hifi-0 [bcm2835-i2s-wm8960-hifi wm8960-hifi-0]
  Subdevices: 0/1
  Subdevice #0: subdevice #0
To test sound capture, I enter
arecord -D "plughw:wm8960,0" -f dat -d 10 -t wav voicetest.wav… and then I make some sounds while the recording goes on for 10 seconds. Afterwards, I can play back the recording and verify that it sounds ok
aplay -D "mix8960" voicetest.wavInstall Rhasspy
This was tested with Rhasspy 2.5.11. You can download the .deb installation package from Github, put this won’t install out of the box with newer (>10) Raspbian versions, because of some missing dependencies. I followed this forum contribution, which explains how to adjust the .deb package.
First, you download the package, and unpack it
wget https://github.com/rhasspy/rhasspy/releases/latest/download/rhasspy_armhf.deb
dpkg-deb --extract rhasspy_armhf.deb tmp
dpkg-deb --control rhasspy_armhf.deb tmp/DEBIAN
This took a long time, I should have done this on a fast Intel machine…
Next, you edit tmp/DEBIAN/control like so
Depends: jq,sox,libportaudio2,libatlas3-base,libstdc++6,libgfortran5,supervisor,libopenblas-dev,libgomp1,libatomic1Now we re-package it.
dpkg --build tmp rhasspy_armhf_for_bookworm.debFinally, we can install the dependencies and then the package itself
sudo apt-get install jq sox libatlas3-base supervisor libportaudio2 libffi6 libopenblas-dev
sudo apt-get install mosquitto libssl1.1
sudo apt-get install ./rhasspy_armhf_for_bookworm.deb
Configure the satellite
Start Rhasspy, browse to the Web UI at http://machinename:12101/advanced, choose a siteId ( a name for the satellite )and copy & paste these settings, then click Save Profile:
{
    "intent": {
        "system": "hermes"
    },
    "microphone": {
        "arecord": {
            "device": "plughw:CARD=wm8960,DEV=0",
            "udp_audio_host": "localhost",
            "udp_audio_port": "12202"
        },
        "system": "arecord"
    },
    "mqtt": {
        "enabled": "true",
        "host": "your-mqtt-server-name-goes-here",
        "site_id": "your-site-id-goes-here"
    },
    "sounds": {
        "aplay": {
            "device": "mix8960"
        },
        "system": "aplay"
    },
    "speech_to_text": {
        "system": "hermes"
    },
    "text_to_speech": {
        "system": "hermes"
    },
    "wake": {
        "porcupine": {
            "keyword_path": "porcupine_raspberry-pi.ppn",
            "udp_audio": "localhost:12202"
        },
        "system": "porcupine"
    }
}
You may get some error messages on the Web UI saying that certain modules are not installed. If that happens, just go ahead and install through the Web UI.
You can also edit the profile in /home/username/.config/rhasspy/profiles/en/profile.json while Rhasspy is not running.
Now, when I switch to the Settings page, it looks like this (I have obviously chosen a site id of “raspi7“). Basically I have selected
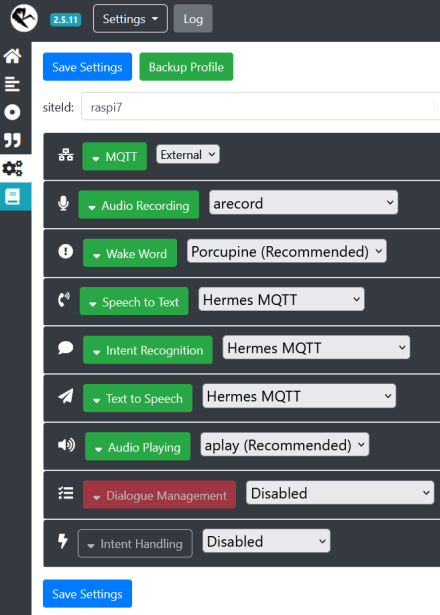
- audio recording is done with
arecord, using the deviceplughw:CARD=wm8960,DEV=0, streaming audio content to localhost:12202, until the wake word is detected. - wake word detection listens for the word “porcupine” on audio stream localhost:12202 .
- speech to text is done on the the server, once the wake word has been detected
- intent recognition is also done on the server, not on the Raspberry Pi satellite
- text to speech is also done on the server, and streamed to the satellite via MQTT
- No dialog management (listen – beep after wake word – listen to command etc) is done on the satellite
Start Rhasspy automatically
Create a systemd service file /etc/systemd/system/rhasspy.service with this content
[Unit]
Description=Rhasspy Service
After=network-online.target syslog.target

[Service]
Type=simple
User=admin
WorkingDirectory=/home/admin  # <-- adjust this to your setup
ExecStart=/bin/bash -c '/usr/bin/rhasspy --profile en 2>&1 | cat'
StandardOutput=syslog
StandardError=syslog
RestartSec=10
Restart=on-failure
SyslogIdentifier=rhasspy

[Install]
WantedBy=multi-user.target
then enter (as root)
systemctl daemon-reload
systemctl enable rhasspy
systemctl start rhasspy
Let the master know about the satellite
Finally, you need to make the satellite known to the master Rhasspy installation. Browse to the Web UI on the server where your Rhasspy master is running, and add the site id for our new satellite to the “Satellite siteIds” fields in the sections “Speech to Text”, “Intent Recognition”, “Text to Speech” and “Dialogue Management”. Here’s what this looks like on my installation, with multiple satellites:

Location and orientation
The optimal orientation would be with the sound card vertical, I suppose, with the microphones pointing towards the person speaking a command. In my setup, orientation is far from ideal, but it still works sufficiently well, maybe due to my particular settings (see above). In one room, the Raspberry Pi + ReSpeaker HAT sandwich is on top of a bookshelf, i.e. with the microphones facing upwards, i.e. the voice source (me) at -30° elevation, both microphones at an equal distance from me (let’s call that 0° azimuth), about 3m away. In another room, the sandwich is on a low shelf, again with the microphones facing upwards, the voice source typically at 0° elevation, about 1m away from where I typically sit, but I am way off to the side, almost 90° azimuth.
The Raspberry Pies are not in a closed case though, I only use a Simple Case made of plexiglas sheets, with the top shelf over the microphones replaced with a piece of perf board.
Conclusion
Everything works reasonably well, I hardly ever have to repeat myself, and I don’t have to raise my voice. Sometimes, there is a “false start”, i.e. the system detects the wakeword “Porcupine” when I didn’t say anything, but the TV or radio was playing … although I have never heard them use the word “porcupine” on TV …