In part 1 of this series I told you about my objectives for and anticipated benefits of a home automation system. Today, in part 2, I’ll describe what I actually built. Part 3 will look at the real benefits of the system, after several years of use, and share some lessons learned.
Design decisions
Based on the technical constraints and requirements stated in part 1, and the desired benefits and capabilities, I made a couple of basic design decisions at the beginning:
- The central server, running the home automation controller software, will be a regular x86 computer running multiple virtual machines. This way, if the home automation controller crashes, other functions such as a media server will not be affected.
- All home automation modules will communicate via MQTT, I avoid relying on “bindings” specific to one home automation controller, such as openHAB. I wanted the option of switching to a different home automation controller if I didn’t like the one I started with.
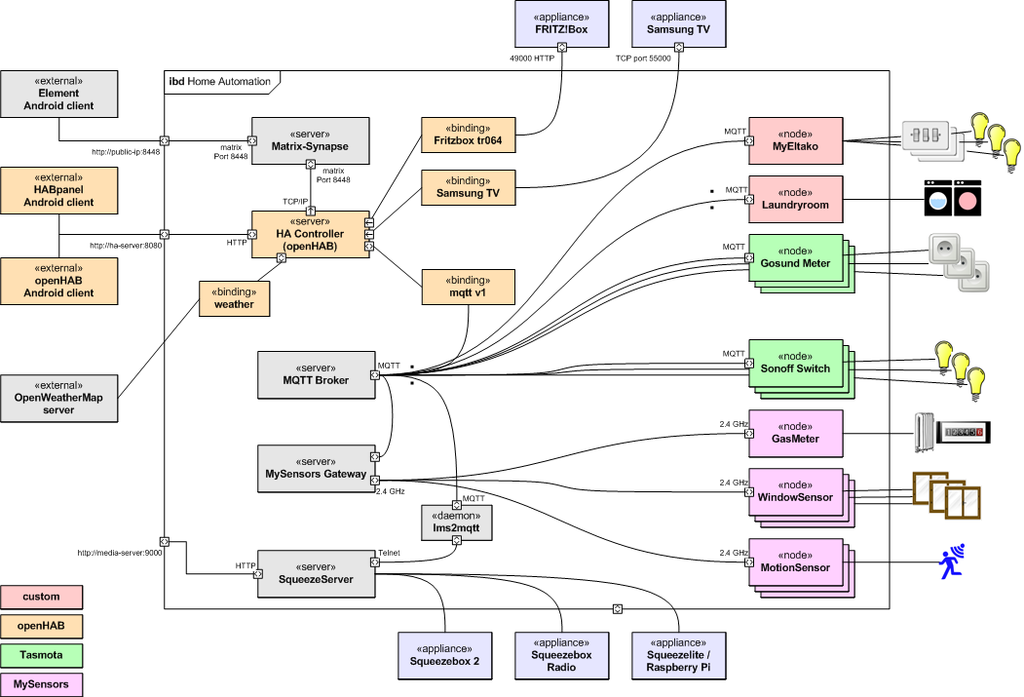
Architecture
- MQTT broker mosquitto, running on a Linux VM.
- Home automation controller: openHAB 2.5 running on a Linux VM.
- All sensor nodes (MySensors and WiFi) report via MQTT.
- All actuator nodes (MySensors and WiFi) are controlled via MQTT.
- MySensors MQTT gateways: 2x Raspberry Pi (also used as media players).
- Dashboard via openHAB (HABpanel and Basic UI) on a PC, tablet, and smartphone.
- Access to the dashboard from outside the house is only through a VPN connection from my smartphone or tablet to the home network.
- A Matrix Synapse instant messaging server running in a separate Linux VM. The home automation controller can send instant messages via this server, which are picked up by the Element client app on my smartphone.
Off-the-shelf appliances
- FRITZ!Box DSL router and VoIP interface
- 2 Samsung TV sets, connected to the network via Ethernet
- several Squeezebox type media players, both “real” devices from Squeezebox and Logitech, and emulated devices using a Raspberry Pi
Dedicated home automation hardware
- Battery-powered sensor nodes with an ATmega microcontroller, based on the MySensors 2.4 GHz RF communication framework, with a cost under 10€ each. Most of them use the Slim Node PCB published by a MySensors user, some are based on Chinese clones of the Arduino Pro Mini.
- Door/window sensor
- Motion sensor
- Gas meter readout sensor
- Sonoff and other ESP8266-based nodes for switching mains power, and measuring power consumption, using Tasmota firmware.
- A custom-made unit, ATmega based, to control an RGB LED strip for hallway lighting, also communicating via MySensors 2.4 GHz RF.
- A custom-made unit, ATmega based, to interface with the electronic impulse switches installed in the main fuse box in our home. Light switches in each room are wired to these impulse switches, which control ceiling lights and bathroom and kitchen fans. The custom-made unit is wired in parallel with the light switches, and allows (a) to sense when a switch is pressed (i.e. I can trigger other home automation actions by pressing a light switch on the wall), and (b) to simulate switch presses (i.e. allow the home automation controller to turn ceiling lights and fans on or off).
- A custom-made unit, ESP8266 based, to measure power consumption of a washer and dryer, and display cost of the last cycle.
Nodes
- 11x door/window contacts (MySensors)
- 7x motion sensors (MySensors)
- 2x gas meter sensors (MySensors)
- 2x controllers for LED strips (MySensors)
- 7x power meter (Gosund SP1), tracking energy consumption of the fridge, freezer, my desk computer and peripherals, my wife’s desk computer and peripherals, TV/media center, my lab bench and the home server
- 3x power switch (Sonoff Basic), to control table lamps
- 2x power meter/switch (Sonoff POW) to control the ironing board and my wife’s sewing table
Cost
Total materials cost so far is ca. €300, not including the computer hosting the home automation controller VM, and the Raspberry Pies, which are used for other purposes as well.
Operating cost is driven by the intrinsic power consumption of the Gosund and Sonoff power switches, about 0.6 W each, so 0.6 W x 12 units x 24h x 365d = 63 kWh ~ €20 per year.